For many Brits, the last time they thought about wiring a plug was in GCSE physics. Back then, the task might’ve felt easy peasy. But years later, when you pop open the casing, the colourful wires staring back at you might have you scratching your head.
Lucky for you, I’m revisiting the topic today, giving you a certified sparky’s rundown of how to rewire a UK plug properly according to British safety standards, plus when the job is reasonable to tackle yourself.
Quick disclaimer, though: While it runs seamlessly in the background, electricity is not to be trifled with; nine out of ten electrical fires are caused by dodgy electrical products, with the vast majority linked to everyday appliances like cookers, washing machines and chargers. Thus, you should follow my instructions to the letter or, better still, leave it to the experts if you’re unsure.
With that preamble sorted, let’s get down to business.
Skip ahead to:
- When You Might Need to Rewire a Plug
- Safety First: Precautions You Need to Heed
- UK Plug Wiring Basics
- How to Rewire a Plug Step-By-Step
- Common Mistakes I’ve Seen: Dos & Don’ts
- Conclusion: If In Doubt, Get an Expert In!
When Might You Need to Rewire a Plug?
Truthfully, not that often. Ever since The Plugs and Sockets etc. (Safety) Regulations were passed in 1994, the law has required all new domestic appliances in the UK to be supplied with a pre-wired, approved and correctly fused plug. That’s the BS1363 “square” pin plug we all know and love.
Nonetheless, there are a few rare scenarios that might call for you to whip out the ol’ screwdriver and wire cutters.
- The plug is damaged/ broken and needs replacing
- You’re replacing a moulded plug
- You want to shorten the cable
- The appliance lead is being repaired
Are There Any Benefits to DIYing it?
As far as electrical repairs are concerned, this is the easiest one of the bunch. In fact, there are few home rewiring jobs I’d recommend giving a go, for both safety and compliance reasons.
Rewiring a plug can be handy to do yourself because:
- It’s a quick and straightforward fix for a damaged plug
- You don’t need to throw away an appliance that works perfectly well otherwise
- You’re doing your bit for the planet by reducing e-waste
- It’s a useful DIY skill to have in your back pocket.
Again, don’t rule out professional assistance if you’re not a big DIYer. With this task, there’s little room for error, and it’s often not immediately clear when you’ve made a mistake until something seriously goes wrong – like an electrical shock, overheating, electrical faults, damaged appliances, and fire risks at the worst end of the spectrum.
Safety First: Precautions You Need to Heed
Dealing with electricals of any sort requires massive attention to detail and care. To do your due diligence, take stock of these key precautions before you even think about grabbing your kit.
- Turn off the power and unplug: As sobering as it sounds, people have died trying to rewire a plug whilst it was connected to the mains. You must, and I mean must, keep it disconnected throughout the process and never plug it back in with the case still unsealed.
- Work in a clean, dry environment: You know the drill – electrics and water cannot mix – so to prevent any moisture from getting where it isn’t wanted, you’ll want to rewire the plug in a suitable, dry space.
- Use the right tools: Not any old thing will do; for a neat, safe job, you’ll need proper wire cutters and strippers.
- Don’t attempt if you’re confused: If you’re baffled by the process, that means you shouldn’t undertake it. Always refer to a qualified electrician in this instance.
UK Plug Wiring Basics
Behold, the iconic British 3-pin plug – one of the safest pieces of electrical hardware in the world. But how do they work? Here’s a handy rundown.
British plugs (not to be confused with plug sockets) are designed to be safe and compatible with 230-volt electricity. Inside, they host a series of wiring, a fuse that blows when something goes wrong in the system, and a cable grip to hold everything in place snugly.
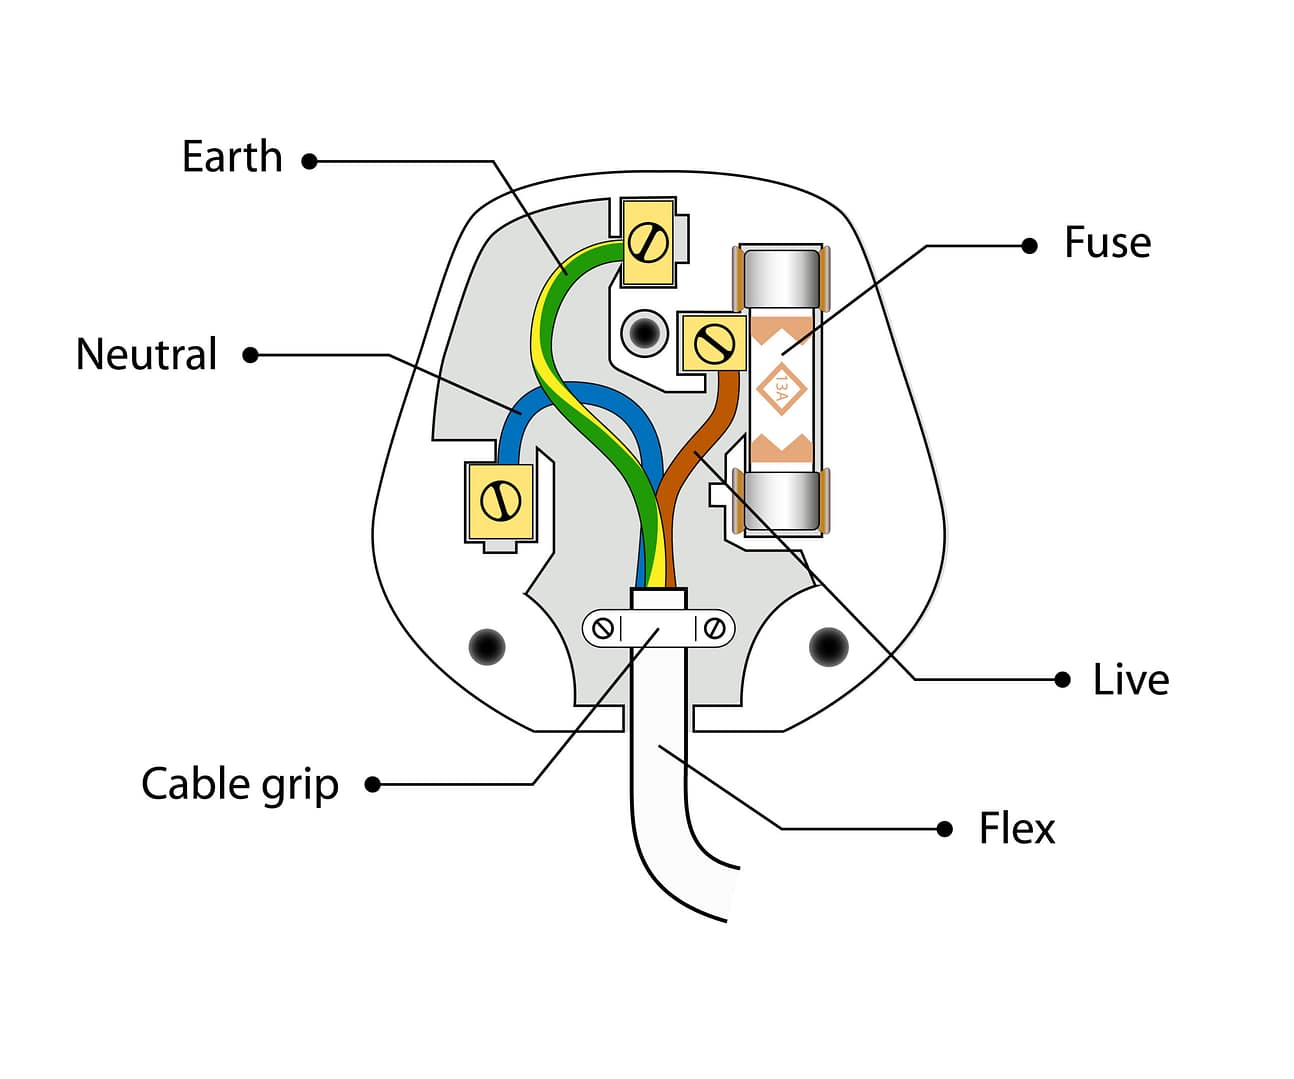
As per the diagram above, the plug includes three different wires at the following positions. As a quick shorthand to remember their positions, note where I’ve emboldened.
- Live (L): Brown at the right terminal
- Neutral (N): Blue at the left terminal
- Earth (E): Green/yellow striped at the top terminal
How to Rewire a Plug Step-By-Step
1. Open Plug Casing
Firstly, to reach the necessary components, you need to remove the retaining screw with a screwdriver. Remove the top and set it to one side, along with the retaining screw for safekeeping. If your plug has a screw-fitted clamp, remove this too. Note that in the case of the clamp, removing just one of the retaining screws will do.
2. Strip Cable Safely
Cut and strip the cable to the correct length, ideally 6mm. As you do so, take care not to nick or damage the copper strands, as this will only weaken the wire and diminish the quality of the connection.
3. Connect Wires to the Correct Terminals
Next up, connect each wire to the correct terminal (Live/Brown =right, Neutral/Blue = left, Earth/Striped = top), ensuring that they’re properly attached. If in doubt, check the diagram above or the wiring illustration that sometimes comes with the plug.
Here, there ought to be a retaining screw directly on top of the copper, not the insulation, and no more than 1mm of exposed copper beyond the terminal.
Top tip: Always leave more slack in the earth wire, so when any accidental tugging happens that dislodges the wires, it’ll be the last to disconnect. This will keep folks in the vicinity much safer against the risk of shocks.
4. Secure Cable Grip
With all of the wires properly attached, you can secure the cable grip back in place to hold everything tight. It should touch only the outer insulation, not the inner wires.
5. Check Fuse Rating
Take a moment to check that the fuse rating is correct or replace it if necessary. Here, the standard for appliances under 700 watts is 3A, while more powerful equipment up to 3000 watts needs a 13A fuse.
6. Reassemble Plug
With the fuse, wires and connections all present and correct, it’s time to close things up. Refit the lid and return each of the retaining screws, tightening them until the casement won’t budge. Et voilá, the plug is wired correctly!
Common Mistakes I’ve Seen: Dos & Don’ts
You’d be surprised at the number of botched jobs and frankly scary DIY wiring I’ve seen over the years, servicing homes across Yorkshire from Wakefield to York. Here are some of the most common mistakes I’ve set eyes on, and what to do instead.
Don’t: Use the Incorrect Wire Gauges
When you use the improper wire gauge inside your plug, you’re risking a host of hazards. When the wire is too thin to handle the current load, overheating could happen; if it’s too thick, you’ll likely get mechanical issues and loose connections, which both affect performance.
So, rather than ordering some generic wiring online, ensure that you’ve selected the right gauge to match your appliance’s power consumption.
Do: Make the Effort to Use the Right Fuse
One of the most common problems (and most infuriating) I’ve seen pertains to the wrong fuse type being used for the appliance. It’s where many people try to cut corners, but fuse compatibility is no joke; it’s the first and an essential safeguard against system errors that keeps everyone under the same roof safe.
UK appliances are generally fitted with one of two fuse types:
- 3A: for appliances rated up to about 700 watts, including smaller items like table lamps, TVs, kitchen gadgets, computers, etc.
- 13A: for appliances rated between about 700 watts and 3000 watts, like washing machines, kettles, toasters, dishwashers, and irons.
Don’t: Leave Wires Exposed
Never leave wires exposed when tackling your appliances’ plugs. They should be fully covered by insulation at terminal points to avoid unwanted shocks, accidental contact between elements, and short circuits.
Do: Check You’re Using the Right Plug
While 99% of the time, you’ll be dealing with a modern, safety-compliant plug, sometimes older ones or those designed for a different region slip through.
Here, it’s super important that your plug is compatible: a UK plug is specifically designed to operate with the 230V mains electricity used in British homes, meaning that mismatches could spell problems with performance, malfunctions, safety standards and even damage the appliance.
Don’t: Rush to the Finish Line
In my experience, hasty jobs are always subpar jobs. In the context of rewiring an appliance plug, it’s the top culprit of loose connections and incorrect wire placement, not to mention missed damage to the fuse, cable or terminals.
Take a breath and slow down; at every step, you ought to be reviewing your work to check that you’ve hit the mark. Yep, precision is king.
Conclusion: If In Doubt, Get an Expert In!
Bosh! That was how to wire a British plug, the right way. Although it’s not the trickiest job in the world, it does get a little fiddly, so rushing it is absolutely not an option. Double- even triple check the wiring is correct, the fuse is suitable, and the cable is secure. And get a second opinion if needs be.
That said, when even after all your efforts you still find yourself struggling or the plug isn’t behaving as it should, take this as a sign to bring in the professionals. I can’t emphasise it enough: the consequences of a subpar job aren’t worth it.
Need a hand? No worries, I’m here to help. Get in touch with the Finney Electrical crew for advice on your electrical needs – not only are we accredited, but we’re seriously invested in our customers’ wellbeing. We’ll get those plugs wired up in a jiffy and can throw in our PAT testing service while we’re at it, so there’s zero room for uncertainty.