Small yet significant, the placement and wiring of our light switches determines the convenience, safety and all-round liveability of our homes. So, when something goes wrong or it’s time to upgrade, what do you do?
That’s exactly what this Finney Electrical guide to connecting a light switch tackles. By the end of it, you’ll have a clear picture of the process and where to place them, but more importantly, whether it’s a good idea to handle it yourself or leave it to the pros.
Get ready for real, actionable tips from our top electricians. Let’s get cracking.
Skip ahead to:
- Safety Disclaimer
- When You Might Need to Connect a Light Switch
- Is it DIYable?
- UK Wire Colours
- How Light Switches Work
- Step-by-Step Process
- Common Mistakes
- Signs You Need an Electrician
- Conclusion
Disclaimer: Electrical Work is Not to be Trifled With
You probably knew this was coming, but nonetheless, it has to be said: working with electricity is inherently dangerous. Live current can kill.
If you do end up tackling it yourself, please take care and resist the urge to rush. Cut corners invariably lead to mistakes, which come back to bite you, or your electrician, when they come around to patch things up.
Case in point: an Electrical Safety First survey revealed that 30%+ of electricians experienced electric shocks due to incompetent DIYers, and 15% reported that botched work had caused an electrical fire.
Don’t let this be you; always isolate the circuit, never work on live wiring, and if unsure call a qualified electrician. Another thing: don’t skimp on the research (no, TikTokers or tutorials from random, unqualified people), as UK building regs might apply.
When Might You Need to Connect a Light Switch?
You might be rewiring your entire house or just a tiny corner of it, for aesthetic reasons or down to motivations more practical. In my experience, the most common is a simple cosmetic upgrade, replacing ugly white backplates with something brassy, more expensive looking.
Many homeowners also take light switch repairs as an opportunity to switch (pun unintended) to smart lighting, now made easy by modern smart WiFi switches, which still work as like-for-like replacements. No extra wiring needed.
In the case of extensions, renovations or ceiling lights being popped in for extra visibility, you’re more likely to require a proper rewiring job, with chases cut into the walls for new wires.
Occasionally, homeowners will have to ditch the old switch after a fault finding session, if it turns out a failure is local to the switch. The typical tells are:
- Unhealthy sounds, like popping and crackling
- A faceplate or switch that is hot to the touch
- Lagging between flicking the switch and the light illuminating
- Wobbly hardware, like a loose switch
Is it DIYable?
There’s no specific law stopping you from rewiring a light switch in the UK, provided it’s a simple, like-for-like replacement. In other words, you’re swapping an old faceplate for a new one without moving the switch or altering the existing circuit.
That said, be sure to run through these prior considerations beforehand, in case you run into anything unexpected.
DIY-Friendly
- Like-for-like replacements
- Existing wiring is nicely labelled and what you expect
- It’s a modern installation
- Everything looks in good nick
Professional Recommended
- Multiple gangs (no, not that type of gang) on the faceplate
- You’re dealing with two-way switching or three-way circuits
- There’s no earth
- You’re seeing old, outdated wiring colours
- The wiring is aluminium
- You’re experiencing consumer unit issues
- The light switch is in a “special location” like a bathroom
Stumped? Take that as indication that you need a top electrician’s magic touch. At Finney Electrical, we’ll happily identify the wiring before any work starts and advise you on the right course of action.
A Quick Primer on UK Wire Colours
Hold your horses! We can’t jump immediately into the process, well, not until you’re confident that you have the wiring setup imprinted on the back of your eyelids. It all begins with an understanding of UK wire colours. Allow me to explain.
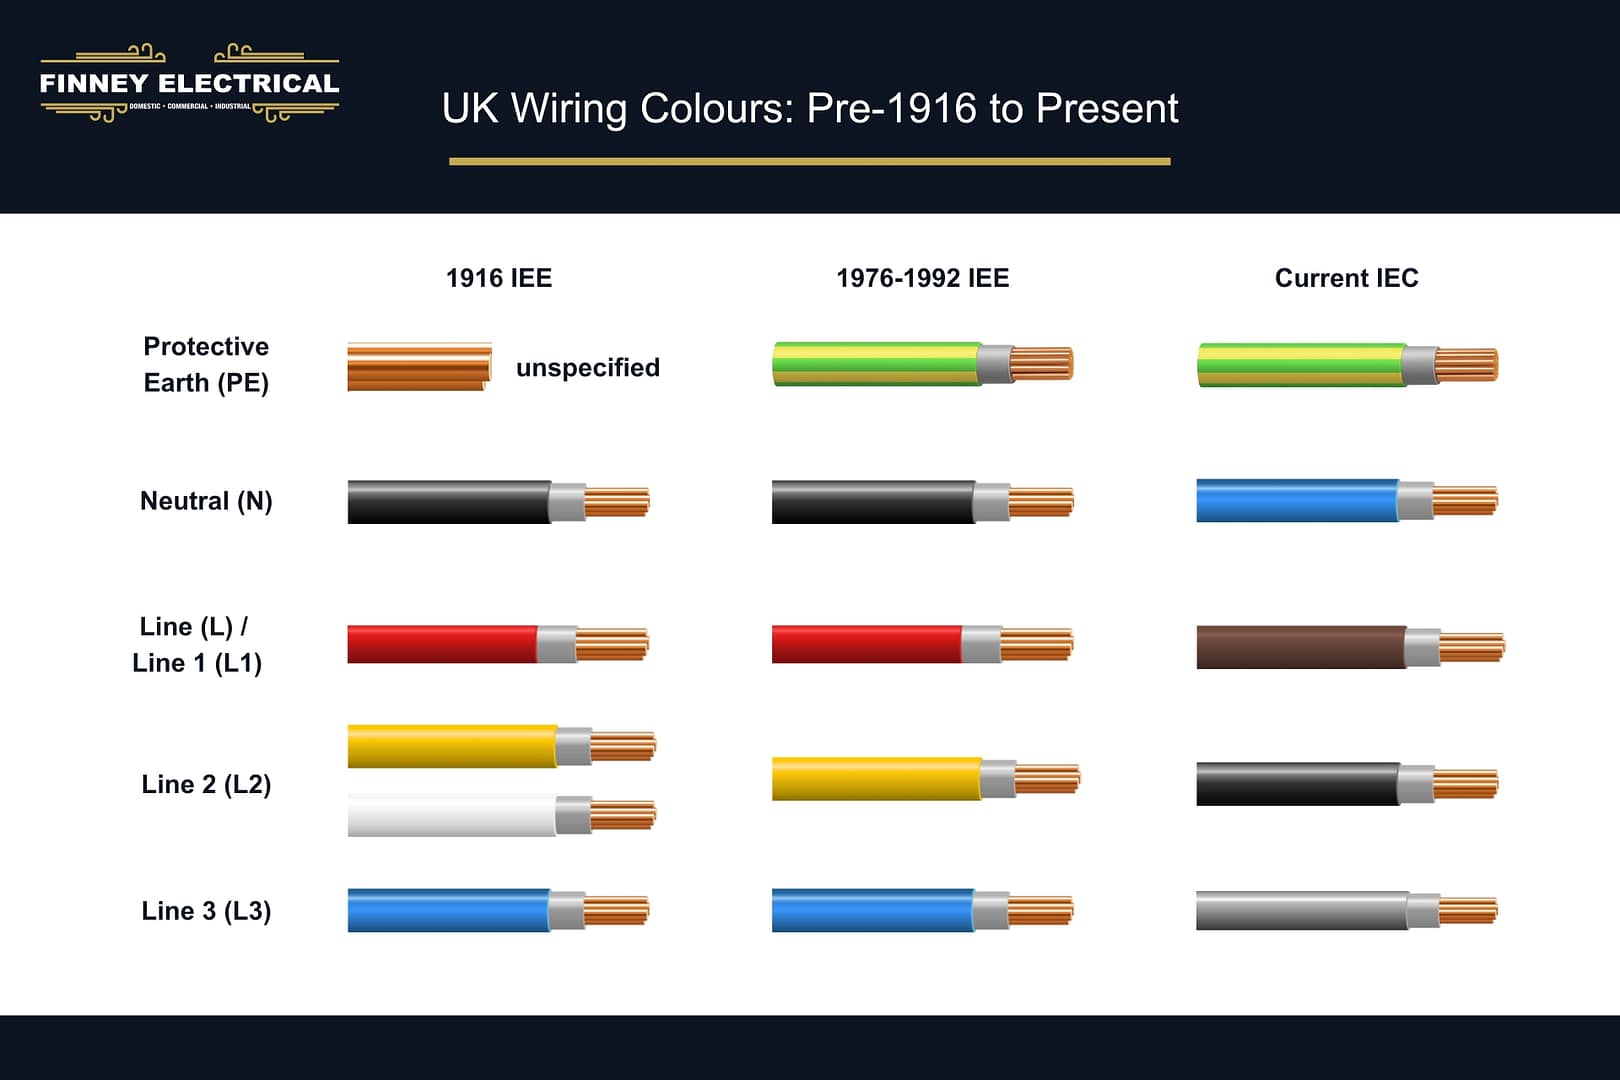
Under the IET Wiring Regulations (BS7671), wires must be colour-coded as follows:
- Brown = Live – the wire responsible for carrying current to the outlet
- Blue = neutral – the wire carrying current away from the outlet
- Green/yellow = earth – a safety feature designed to trip the electricity by providing a low-resistance path to earth
If you’re lucky enough to own a beautiful period property, like those I typically service around York, things might look a little different. Why? Because, prior to 2006, the colours weren’t standardised in harmony with the rest of Europe. As such, older wiring may adhere to previous colour codes, like those in the diagram above. In this situation, I’d get a sparkie to look at it.
How Light Switches Work
Likewise, it pays for safety to understand the mechanics of your light switches and the circuits underlying them. Time to bring you up to speed!
Light switches comprise of a trio of parts:
- A backplate, the square backing piece that gets recessed into the wall
- The electrical wiring housed inside the backplate, hidden from view
- A faceplate, the visible part you see complete with the ‘gangs’ and ‘ways’
So, how do they all come together?
Simply put, your switch is connected up to your home’s wiring at its terminals, these wires are then fed through the walls and ceiling to meet your light fitting and consumer unit. This creates a complete circuit (light on) that you break (light off) when you flick the switch.
A Word on Switch ‘Gangs’ & ‘Ways’
As you’ve likely already gathered, there are many types of light switches out there, with different appearances and configurations. Some control multiple light fittings, and others only control one, their differentiators being what we electricians call ‘gangs’ and ‘ways’.
- Gangs: This refers to how many individual switches you have on the faceplate, each operating a different light fitting. In the UK, the maximum is 4-gang.
- Ways: Basically, the number of switches controlling one light. 1-way switches are most popular in bedrooms, where you only need a single ‘big light’, whereas 2-way switches are more common in hallways and stairwells, where multiple control points are more convenient.
Your Trusty Tutorial: How to Wire a Light Switch in the UK
With those essential preliminaries accounted for, we can get down to business. Here’s how I connect up new light switches to my clients’ light fittings and even my own (I vlogged it, if you’re interested).
What You’ll Need
- Voltage tester
- Insulated screwdriver
- Wire strippers
- Replacement switch
- Electrical tape / sleeving
- Needle nose pliers
- Gloves
Step 1) Switch of the Electrics to Isolate the Circuit
For safety, switch off the main breaker and ensure the circuit is properly isolated before beginning any work. To do so, use an appropriate, well-rated voltage tester to detect any current in the circuit. When you have the all-clear, you can proceed.
Step 2) Remove the Old Switch & Inspect What’s Going on in There
Remove the old faceplate from the wall by loosening the retaining screws, and have a good look in there for signs of damage. At the same time, inspect that the wiring is all present and correct. If you’re lucky, the previous electrician may have labelled them nicely for you.
Typically, a 1-way switch will have two terminals: COM at the top along with L1 at the bottom.
Spot anything off? I’m thinking signs of overheating, broken components, or unfamiliar wiring colours. Then, you should let a trained professional step in.
Step 3) Disconnect the Old Hardware Carefully
Gently loosen the terminal screws holding the wires in place and just as gently coax them out and put the old light switch to the side.
Step 4) Connect Up the New Switch
Check that the ends of the wires are cleanly twisted together, no stray strands to be seen. The needle nose pliers are there if you need to tidy up.
Similarly, you might have to strip the wires and give them a little trim. The sweet spot is around 15mm of bare wire; this lets you wire up the new terminals snugly.
Now you can start attaching them to the correct positions, giving them a gentle tug to check they’re installed tightly:
- Brown/ live feed into the COM terminal
- Blue/ switch wire goes to the L1 terminal
- If installing a metal faceplate the green/ yellow earth wire should connect to the faceplate
Note: the blue switch wire typically has a brown sleeve or tape indicating it’s a live circuit rather than a neutral circuit as the colour would normally suggest.
Step 5) Re-Fit Faceplate
With everything properly installed, it’s time to add the new faceplate. Again, grab your screwdriver and return the retaining screws. If they’re a bit worse for wear, use new screws.
Step 6) Restore Power & Test Safely
Once you’re happy that the switch is securely installed, you can turn the power back on and conduct a few tests.
Start by flipping the switch on and off a few times to ensure a firm, mechanical click and, of course, that the light fitting behaves as expected.
Also, with your voltage tester, you can check that the incoming terminal has power by taking off the faceplate again (with the power off) and touching the tip of the voltage tester to that terminal screw with the power back on again; it should beep or light up.
With the tester still touching the incoming terminal, flip the switch off. The tester should only light up/beep when the switch is in the on position.
Common Mistakes I’m Always Fixing Out on the Job
When you’ve been in the trade for as long as I have, you really see everything. Things that make my toes crawl and my eyes roll into the back of my skull. And it’s not just anecdotal: a 2026 survey found that almost a quarter of UK homeowners are at risk of electrical problems… yikes.
As it pertains to light switches, here are some of the fumbles that commonly crop up. Knowing them will help you do the best job and keep you well out of that statistic.
- Loose terminal screws – Instead of letting your wires work loose over time, and experiencing all of the resultant flickering and overheating, keep those screws tight and your power consistent. The byproduct? A massively reduced risk of electrical fire.
- Mixing up the live and switched live wires – Connecting the wires to the wrong terminals can prevent the light from working correctly or leave parts of the circuit live when they shouldn’t be. An absolute no-no.
- Earth disconnected – Insufficient earth = insufficient protection, it’s simple as that. Plus, leaving it disconnected, particularly on metal switch plates, can increase the risk of electric shock if the faceplate becomes live.
- Wrong switch rating – Standard UK switches usually sit at 10A, but always double check that they match or exceed the circuit’s electrical load, otherwise you risk overheating.
- Not isolating and testing the circuit properly – Never skimp on electrical safety checks. Here, simply switching the light off isn’t enough; the circuit must be isolated at the consumer unit and tested with an appropriate voltage tester to be certain it’s safe to carry out the work.
- Damaged insulation – Nicking or crushing the insulation while stripping or fitting the wires can expose live conductors, bringing not only the risk of harm to you but amping up both wear and tear and fault potential.
- Overtightened screws – Overkill with the screwdriver leads to damaging your terminals. That means weak connections which may fail over time.
- Incorrect cable identification – Make sure the wiring is properly labelled for the next person who comes along to do future maintenance.
Signs You Need a Sparkie’s Touch
Honestly? The main one is that nagging worry that you’re going to do something wrong. If you’re anxious about the task or still have tons of questions it probably means you’re not ready.
I also recommend packing away your tools if…
- The circuit won’t isolate or you’re unsure which breaker controls the lighting circuit
- The wiring doesn’t match modern UK colour codes or isn’t clearly identifiable
- The switch is part of a two-way, intermediate, or smart switching circuit, where you have to juggle many switch locations
- You discover damaged insulation, overheating, scorch marks, loose connections or other indications of electrical faults
- The circuit trips the MCB or RCD after replacing the switch.
- The installation has very old wiring (e.g. VIR or rubber-insulated cable) or shows signs of deterioration
- There is no earth conductor where one is expected
A five-minute switch replacement can become dangerous very quickly if the wiring isn’t what you expected. If anything looks unusual, we’d always rather you called us than took a risk.
Conclusion: If You’re Not 100% Confident, Get an Electrician on Board
Now you’ve looked through the proverbial peephole into connecting up a light switch, you’ll be in a much better position to decide whether you have the technical chops to do it yourself.
If even the tiniest hint of doubt comes up, I recommend getting a helping hand from the professionals. Speaking of… the Finney Electrical crew would be very happy to assist. Just give us a shout and we’ll sort you out.